Have you ever looked at a garden and felt like something was missing, even though the flowers were beautiful? Usually, the missing ingredient is a clear edge.
Edging is like the frame around a painting. It separates the chaos of nature (the flower bed) from the order of the lawn. While there are many materials to choose from—plastic, metal, concrete—nothing beats the timeless warmth of Brick.
As Shiny Aura, I love brick edging because it ages beautifully. It doesn’t crack like plastic or rust like steel. It develops a patina of moss and weather that makes a new house feel established. Whether you want a formal look or a rustic cottage vibe, here are 10 brick edging ideas to sharpen up your front yard.
In this article, we'll cover
- 1. The “Mow Strip” (Flush Ribbon)
- 2. The Diagonal “Sawtooth” (Domino)
- 3. The Soldier Course (Standing Upright)
- 4. The Curved Sailor Course
- 5. Reclaimed/Tumbled Brick
- 6. The Double-Wide Border
- 7. Herringbone Accent Sections
- 8. Whitewashed or Painted Brick
- 9. Brick and Gravel Combo
- 10. The Raised “Seat Wall” Edge
1. The “Mow Strip” (Flush Ribbon)
This is the most practical design on the list. Bricks are laid flat and flush with the ground, creating a ribbon separating the grass from the mulch.
The Benefit: It is a huge time-saver. You can run one wheel of your lawnmower right over the bricks, eliminating the need to use a string trimmer (weed whacker) to tidy up the edges. It looks clean, neat, and unobtrusive.
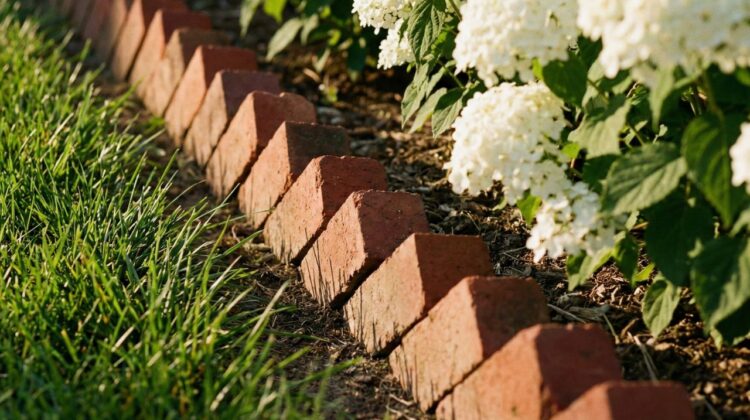
2. The Diagonal “Sawtooth” (Domino)
For a vintage, Victorian charm, install the bricks at a 45-degree angle. This creates a jagged, shark-tooth pattern that sticks up out of the ground.
The Look: This style creates wonderful shadows and adds texture. It is particularly effective for holding back mulch in a slightly raised garden bed. However, it requires careful trimming of the grass around the “teeth.”
3. The Soldier Course (Standing Upright)
Instead of laying bricks flat, stand them up vertically, side-by-side like soldiers in formation. This creates a solid, uniform wall about 4-8 inches high.
Why it works: It creates a strong visual line that guides the eye. It is perfect for formal gardens or for creating a distinct border around a focal point tree. It holds soil back very effectively.
4. The Curved Sailor Course
Bricks are rectangular, but that doesn’t mean your garden has to be square. Laying bricks end-to-end (the “Sailor” position) makes it easy to create gentle, sweeping curves.
Design Tip: Use a garden hose to lay out your curve before digging. A meandering brick border softens the harsh lines of a driveway or sidewalk, making the front yard feel more organic and welcoming.
5. Reclaimed/Tumbled Brick
If you want instant character, don’t buy new bricks from the big-box store. Look for “tumbled” or reclaimed bricks that have rounded edges and chipped corners.
The Aura: This adds an “Old World” or English Cottage feel. Mix different shades—reds, browns, and greys—to create a tapestry of color that looks like it has been there for a century.
6. The Double-Wide Border
For a grander statement, create a double row of bricks. You can do a “Header” row (short end facing out) backed by a “Stretcher” row (long side facing out).
The Impact: A wider edge looks more expensive and substantial. It works well for large properties where a single line of brick might get lost visually in the landscape.
7. Herringbone Accent Sections
You don’t have to limit herringbone patterns to walkways. Using this intricate zigzag pattern as a wide garden border is a showstopper.
Best For: Framing a very special feature, like a front yard fountain or a high-end statue. It signals craftsmanship and attention to detail.
8. Whitewashed or Painted Brick
Does traditional red brick clash with your house color? Paint it! A soft whitewash (where some of the red shows through) looks stunning in a Shabby Chic or Farmhouse landscape.
Shiny’s Tip: Use masonry paint that allows the brick to breathe. White bricks look exceptionally bright against dark mulch and green boxwood shrubs.
9. Brick and Gravel Combo
Use a row of standing bricks to hold back the garden soil, and then a strip of pea gravel in front of it to separate it from the lawn.
Functionality: This creates a multi-layered buffer zone. It improves drainage and prevents grass roots from creeping into your flower beds.
10. The Raised “Seat Wall” Edge
If you have a sloping front yard, take your edging to the next level—literally. Stack bricks 18-24 inches high to create a low retaining wall that doubles as a seat wall.
The Vibe: It turns a garden border into a functional seating area where you can sit and chat with neighbors. Top it with a flat capstone for comfort.
Installation Pro Tip
Don’t just place bricks on the dirt! For a border that stays straight and level, dig a trench, lay down a base of sand or stone dust, and tamp it down firmly before placing your bricks. This prevents them from heaving during frost or sinking into the mud after heavy rain.